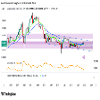
I need feedback on my support resistance zones for Aussie dollar. I'm concerned they might be too big.
What I've done is drawn major zones, and within those major zones, I have what you call sub-zones or sub-structures. Should be easy to see on the chart.
What I'm struggling to figure out is: should I just remove those major zones and leave those sub-zones to be the main zones?
So basically what I'm saying is I'm worried that the major zones I've drawn are too big, and this confusion is making me feel like because Aussie dollar is at one of my major support zones, I should only take longs.
But because it's also inside a resistance zone within that major support zone, I don't have the confluence of major support zone and then add another support zone within the major support zone, which I would think would be ideal for maximizing my edge and increasing the likelihood of the trade going well.
But because it's at the resistance sub-structure, it's not aligned with the major support zone, therefore I don't have enough edge in my favor and I'm buying into resistance, which is not what you want to do.
And there is millions of traders out there. They're not all terrible, who are actually are good and are probably making money buying Aussie dollar right now.
But from what I've learned about order flow and market price structures, it just seems like the majority of pro traders out there wouldn't be buying Aussie dollar right now. I mean would be buying Aussie dollar right now. They wouldn't be selling Aussie dollar because it's at a major support zone.
That's it. All feedback appreciated. Thanks.