




Abandoned Baby Pola Analisis Teknikal
Abandoned Baby Pattern Definition
The Abandoned Baby Pattern is a type of candlestick chart pattern used in technical analysis to signal a potential reversal in the current trend. The pattern consists of three candles: a large bearish candle, followed by a Doji (a candle with a small real body and long upper and lower shadows) that gaps below the first candle, and then a large bullish candle that closes above the midpoint of the first candle. The name comes from the idea that the first candle has been "abandoned" and the second candle is the "baby" that will eventually take its place.
The Abandoned Baby chart pattern is often confused with the Morning Star and Evening Star patterns. The key difference between these patterns is that the bodies and shadows of the candles in the Morning Star and Evening Star patterns may overlap, whereas they cannot overlap in the Abandoned Baby pattern. Furthermore, the second candle in the Morning Star and Evening Star candlestick patterns does not have to be a Doji or exhibit gaps on either side, unlike the Abandoned Baby pattern.
Is Abandoned Baby Bullish or Bearish?
The Abandoned Baby candlestick produces both bullish and bearish indications, and they can be identified by a strong trend, the correct arrangement of the pattern, and the spaces between the candles.
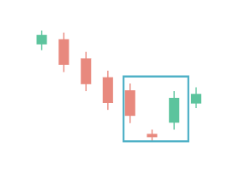
A Bullish Abandoned Baby Candlestick pattern appears in a downtrend and is a reversal signal that suggests the bears have abandoned their position and the bulls have taken control, pushing the price up. The pattern consists of three candles: a large bearish candle, followed by a Doji that gaps below the first candle, and then a large bullish candle that closes above the midpoint of the first candle.
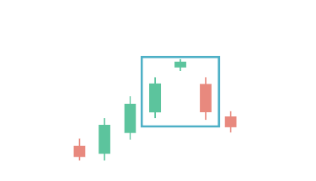
A Bearish Abandoned Baby Candlestick pattern, on the other hand, appears in an uptrend and is a reversal signal that suggests the bulls have abandoned their position and the bears have taken control, pushing the price down. The pattern consists of three candles: a large bullish candle followed by a Doji that gaps above the first candle, and then a large bearish candle that closes below the midpoint of the first candle.
| 1 menit | 5 menit | 15 menit | 30 menit | 1 jam | 4 jam | 1 hari | 1 minggu | 1 bulan | |
|---|---|---|---|---|---|---|---|---|---|
| AUDCAD | - | - | - | - | - | - | - | - | - |
| AUDCHF | - | - | - | - | - | - | - | - | - |
| AUDJPY | - | - | - | - | - | - | - | - | - |
| AUDNZD | - | - | - | - | - | - | - | - | - |
| AUDSGD | - | - | - | - | - | - | - | - | - |
| AUDUSD | - | - | - | - | - | - | - | - | - |
| CADCHF | - | - | - | - | - | - | - | - | - |
| CADJPY | - | - | - | - | - | - | - | - | - |
| CHFJPY | - | - | - | - | - | - | - | - | - |
| CHFSGD | - | - | - | - | - | - | - | - | - |
| EURAUD | - | - | - | - | - | - | - | - | - |
| EURCAD | - | - | - | - | - | - | - | - | - |
| EURCHF | - | - | - | - | - | - | - | - | - |
| EURCZK | - | - | - | - | - | - | - | - | - |
| EURGBP | - | - | - | - | - | - | - | - | - |
| EURHUF | - | - | - | - | - | - | - | - | - |
| EURJPY | - | - | - | - | - | - | - | - | - |
| EURMXN | - | - | - | - | - | - | - | - | - |
| EURNOK | - | - | - | - | - | - | - | - | - |
| EURNZD | - | - | - | - | - | - | - | - | - |
| EURPLN | - | - | - | - | - | - | - | - | - |
| EURSEK | - | - | - | - | - | - | - | - | - |
| EURSGD | - | - | - | - | - | - | - | - | - |
| EURTRY | - | - | - | - | - | - | - | - | - |
| EURUSD | - | - | - | - | - | - | - | - | - |
| EURZAR | - | - | - | - | - | - | - | - | - |
| GBPAUD | - | - | - | - | - | - | - | - | - |
| GBPCAD | - | - | - | - | - | - | - | - | - |
| GBPCHF | - | - | - | - | - | - | - | - | - |
| GBPJPY | - | - | - | - | - | - | - | - | - |
| GBPMXN | - | - | - | - | - | - | - | - | - |
| GBPNOK | - | - | - | - | - | - | - | - | - |
| GBPNZD | - | - | - | - | - | - | - | - | - |
| GBPSEK | - | - | - | - | - | - | - | - | - |
| GBPSGD | - | - | - | - | - | - | - | - | - |
| GBPTRY | - | - | - | - | - | - | - | - | - |
| GBPUSD | - | - | - | - | - | - | - | - | - |
| NOKJPY | - | - | - | - | - | - | - | - | - |
| NOKSEK | - | - | - | - | - | - | - | - | - |
| NZDCAD | - | - | - | - | - | - | - | - | - |
| NZDCHF | - | - | - | - | - | - | - | - | - |
| NZDJPY | - | - | - | - | - | - | - | - | - |
| NZDUSD | - | - | - | - | - | - | - | - | - |
| SEKJPY | - | - | - | - | - | - | - | - | - |
| SGDJPY | - | - | - | - | - | - | - | - | - |
| USDCAD | - | - | - | - | - | - | - | - | - |
| USDCHF | - | - | - | - | - | - | - | - | - |
| USDCNH | - | - | - | - | - | - | - | - | - |
| USDCZK | - | - | - | - | - | - | - | - | - |
| USDHUF | - | - | - | - | - | - | - | - | - |
| USDJPY | - | - | - | - | - | - | - | - | - |
| USDMXN | - | - | - | - | - | - | - | - | - |
| USDNOK | - | - | - | - | - | - | - | - | - |
| USDPLN | - | - | - | - | - | - | - | - | - |
| USDRUB | - | - | - | - | - | - | - | - | - |
| USDSEK | - | - | - | - | - | - | - | - | - |
| USDSGD | - | - | - | - | - | - | - | - | - |
| USDTHB | - | - | - | - | - | - | - | - | - |
| USDTRY | - | - | - | - | - | - | - | - | - |
| USDZAR | - | - | - | - | - | - | - | - | - |
| XAGAUD | - | - | - | - | - | - | - | - | - |
| XAGEUR | - | - | - | - | - | - | - | - | - |
| XAGUSD | - | - | - | - | - | - | - | - | - |
| XAUAUD | - | - | - | - | - | - | - | - | - |
| XAUEUR | - | - | - | - | - | - | - | - | - |
| XAUGBP | - | - | - | - | - | - | - | - | - |
| XAUJPY | - | - | - | - | - | - | - | - | - |
| XAUUSD | - | - | - | - | - | - | - | - | - |
| XPDUSD | - | - | - | - | - | - | - | - | - |
| XPTUSD | - | - | - | - | - | - | - | - | - |
| ZARJPY | - | - | - | - | - | - | - | - | - |