




Belt-hold Technical Analysis Patterns Pola Analisis Teknikal
Bet Hold Candlestick Pattern Definition
The Belt Hold candlestick pattern indicates a minor trend reversal. It consists of a single candlestick that closes inside the body of the preceding candle, as though preventing the price from advancing in the former direction, and can be observed during both an uptrend and a decline.
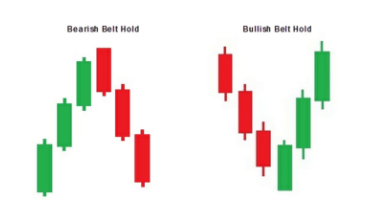
The Belt Hold pattern resembles the Marubozu in that both are composed of candles with no upper or lower shadows and the two candlesticks are typically indicative of reversals. Therefore, there is no significant distinction between the two.
Is Bet Hold Candlestick Bullish or Bearish?
Belt Hold patterns can be classified as either bearish or bullish trend reversals, depending on how the pattern is formed and the direction of the trend in which it appears.
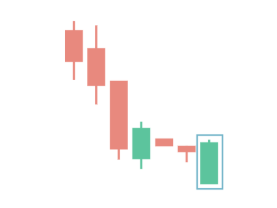
The Bullish Belt Hold is identified in downtrends by a single long bullish candlestick. The bottom of the bullish belt hold candle should be flat or almost flat and compared to the length of the body, the top has a small shadow. The extended bullish body indicates that the price reached a low during the most recent decline but has since reversed with minimal retracement. When a Bullish Belt Hold shows up, the odds increase of a short-term change from a bearish to a bullish one.
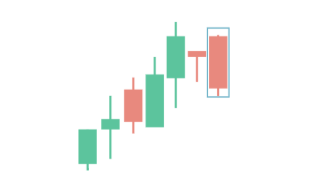
The Bearish Belt Hold, on the contrary, is identified in uptrends by a long bearish candlestick. At the apex of an uptrend, it should stand out by reaching a new recent high and being substantially longer than the surrounding candles. The top of the candlestick should be almost flat, with little or no shadow. The bottom shadow should likewise be short, as this indicates that the price closed near the low of the period.
Bet Hold Candlestick Pattern in Up and Down Trends
In an uptrend, the appearance of the Belt Hold pattern indicates a potential reversal or slowdown in the trend. Traders may interpret this as a sign to take profits or look for a change in market sentiment.
On the other hand, in a downtrend, the Belt Hold pattern signals a potential trend reversal and the start of a new bullish trend. Traders may use this pattern to enter long positions or look for an opportunity to buy.
| 1 menit | 5 menit | 15 menit | 30 menit | 1 jam | 4 jam | 1 hari | 1 minggu | 1 bulan | |
|---|---|---|---|---|---|---|---|---|---|
| AUDCAD | - | - | - | - | - | - | - | - | - |
| AUDCHF | - | - | - | - | - | - | - | - | |
| AUDJPY | - | - | - | - | - | - | - | - | |
| AUDNZD | - | - | - | - | - | - | - | - | |
| AUDSGD | - | - | - | - | - | - | - | - | - |
| AUDUSD | - | - | - | - | - | - | |||
| CADCHF | - | - | - | - | - | - | - | ||
| CADJPY | - | - | - | - | - | - | - | - | - |
| CHFJPY | - | - | - | - | - | - | - | ||
| CHFSGD | - | - | - | - | - | - | - | ||
| EURAUD | - | - | - | - | - | - | |||
| EURCAD | - | - | - | - | - | - | - | ||
| EURCHF | - | - | - | - | - | - | |||
| EURCZK | - | - | - | - | - | - | - | - | |
| EURGBP | - | - | - | - | - | - | - | - | - |
| EURHUF | - | - | - | - | - | - | - | - | |
| EURJPY | - | - | - | - | - | - | - | ||
| EURMXN | - | - | - | - | - | - | - | - | |
| EURNOK | - | - | - | - | - | - | - | ||
| EURNZD | - | - | - | - | - | - | - | - | |
| EURPLN | - | - | - | - | - | ||||
| EURSEK | - | - | - | - | - | - | - | - | |
| EURSGD | - | - | - | - | - | - | - | - | |
| EURTRY | - | - | - | - | - | - | - | ||
| EURUSD | - | - | - | - | - | - | - | - | |
| EURZAR | - | - | - | - | - | - | - | - | |
| GBPAUD | - | - | - | - | - | - | |||
| GBPCAD | - | - | - | - | - | - | - | ||
| GBPCHF | - | - | - | - | - | - | |||
| GBPJPY | - | - | - | - | - | - | - | ||
| GBPMXN | - | - | - | - | - | - | - | ||
| GBPNOK | - | - | - | - | |||||
| GBPNZD | - | - | - | - | - | - | - | ||
| GBPSEK | - | - | - | - | - | - | - | - | - |
| GBPSGD | - | - | - | - | - | - | - | - | |
| GBPTRY | - | - | - | - | - | - | - | - | |
| GBPUSD | - | - | - | - | - | - | - | - | |
| NOKJPY | - | - | - | - | - | - | - | ||
| NOKSEK | - | - | - | - | - | - | - | ||
| NZDCAD | - | - | - | - | - | - | - | - | |
| NZDCHF | - | - | - | - | - | - | - | - | |
| NZDJPY | - | - | - | - | - | - | - | - | - |
| NZDUSD | - | - | - | - | - | - | - | - | |
| SEKJPY | - | - | - | - | - | - | |||
| SGDJPY | - | - | - | - | - | - | - | ||
| USDCAD | - | - | - | - | - | - | - | - | - |
| USDCHF | - | - | - | - | - | - | - | ||
| USDCNH | - | - | - | - | - | - | - | - | |
| USDCZK | - | - | - | - | - | - | - | - | |
| USDHUF | - | - | - | - | - | - | - | - | - |
| USDJPY | - | - | - | - | - | - | - | - | |
| USDMXN | - | - | - | - | - | - | - | - | |
| USDNOK | - | - | - | - | - | - | - | - | - |
| USDPLN | - | - | - | - | - | - | - | - | - |
| USDRUB | - | - | - | - | - | - | - | ||
| USDSEK | - | - | - | - | - | - | - | - | - |
| USDSGD | - | - | - | - | - | - | |||
| USDTHB | - | - | - | - | - | - | - | - | - |
| USDTRY | - | - | - | - | - | - | - | - | |
| USDZAR | - | - | - | - | - | - | - | - | - |
| XAGAUD | - | - | - | - | - | - | - | - | - |
| XAGEUR | - | - | - | - | - | - | - | - | |
| XAGUSD | - | - | - | - | - | - | - | - | - |
| XAUAUD | - | - | - | - | - | - | - | - | |
| XAUEUR | - | - | - | - | - | - | - | - | |
| XAUGBP | - | - | - | - | - | - | - | ||
| XAUJPY | - | - | - | - | - | - | - | - | |
| XAUUSD | - | - | - | - | - | - | - | - | |
| XPDUSD | - | - | - | - | - | - | |||
| XPTUSD | - | - | - | - | - | - | - | - | |
| ZARJPY | - | - | - | - | - | - | - |