




Closing Marubozu Technical Analysis Patterns Pola Analisis Teknikal
Closing Marubozu Candlestick Definition
The Closing Marubozu candlestick pattern is a single candle pattern that is used to determine the strength of a trend. The term "Marubozu" comes from the Japanese word for "shaved head", referring to the lack of wicks on the candle. In a Closing Marubozu, the open and close prices are at the same level, or very close, and the high and low prices are at the same level, or very close.
Is the Closing Marubozu Candlestick Bullish or Bearish?
The direction of the Closing Marubozu candlestick pattern is determined by the relationship between the open and close prices. If the close price is higher than the open price, the pattern is considered bullish, indicating that the buying pressure was stronger during the period represented by the candle. On the other hand, if the close price is lower than the open price, the pattern is considered bearish, indicating that the selling pressure was stronger during the period represented by the candle.
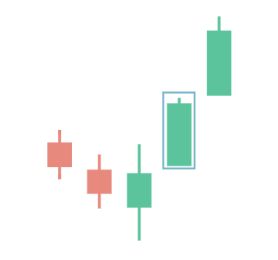
A bullish Closing Marubozu pattern occurs when the open and close prices are at the same level, or very close, and the high price is higher than both the open and close prices. This signals that buyers were in control throughout the entire period and the price rose significantly.
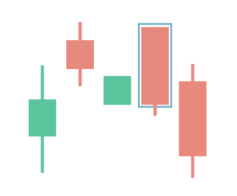
A bearish Closing Marubozu pattern occurs when the open and close prices are at the same level, or very close, and the low price is lower than both the open and close prices. This signals that sellers were in control throughout the entire period and the price fell significantly.
Closing Marubozu Candlestick in Up and Down Trends
The Closing Marubozu pattern is a powerful tool for traders to determine the direction of a trend and the strength of that trend.
In an up trend, a bullish Closing Marubozu candle signals that the bullish momentum is strong and likely to continue.
In a downtrend, a bearish Closing Marubozu candle signals that the bearish momentum is strong and likely to continue.
When used in conjunction with other technical analysis tools, the Closing Marubozu pattern can provide valuable insights into the direction and strength of a trend, helping traders make informed decisions about when to enter or exit trades.
| 1 menit | 5 menit | 15 menit | 30 menit | 1 jam | 4 jam | 1 hari | 1 minggu | 1 bulan | |
|---|---|---|---|---|---|---|---|---|---|
| AUDCAD | - | - | - | - | - | - | - | - | |
| AUDCHF | - | - | - | - | - | - | - | - | |
| AUDJPY | - | - | - | - | - | - | - | ||
| AUDNZD | - | - | - | - | - | - | - | - | |
| AUDSGD | - | - | - | - | - | - | - | - | |
| AUDUSD | - | - | - | - | - | - | - | ||
| CADCHF | - | - | - | - | - | - | - | ||
| CADJPY | - | - | - | - | - | - | - | ||
| CHFJPY | - | - | - | - | - | - | |||
| CHFSGD | - | - | - | - | - | - | - | - | |
| EURAUD | - | - | - | - | - | - | - | - | |
| EURCAD | - | - | - | - | - | - | - | - | |
| EURCHF | - | - | - | - | - | - | - | ||
| EURCZK | - | - | - | - | - | - | |||
| EURGBP | - | - | - | - | - | - | - | - | - |
| EURHUF | - | - | - | - | - | - | - | - | |
| EURJPY | - | - | - | - | - | - | - | - | |
| EURMXN | - | - | - | - | - | - | |||
| EURNOK | - | - | - | - | - | - | - | - | - |
| EURNZD | - | - | - | - | - | - | - | - | - |
| EURPLN | - | - | - | - | - | - | - | ||
| EURSEK | - | - | - | - | - | - | - | ||
| EURSGD | - | - | - | - | - | - | - | - | |
| EURTRY | - | - | - | - | - | - | - | ||
| EURUSD | - | - | - | - | - | - | - | - | |
| EURZAR | - | - | - | - | - | - | - | ||
| GBPAUD | - | - | - | - | - | ||||
| GBPCAD | - | - | - | - | - | - | - | ||
| GBPCHF | - | - | - | - | - | - | |||
| GBPJPY | - | - | - | - | - | - | - | ||
| GBPMXN | - | - | - | - | - | - | - | ||
| GBPNOK | - | - | - | - | - | - | - | - | - |
| GBPNZD | - | - | - | - | |||||
| GBPSEK | - | - | - | - | - | - | - | - | - |
| GBPSGD | - | - | - | - | - | - | - | ||
| GBPTRY | - | - | - | - | - | - | - | - | |
| GBPUSD | - | - | - | - | - | - | - | - | |
| NOKJPY | - | - | - | - | - | - | - | ||
| NOKSEK | - | - | - | - | - | - | - | - | |
| NZDCAD | - | - | - | - | - | ||||
| NZDCHF | - | - | - | - | - | - | - | - | - |
| NZDJPY | - | - | - | - | - | - | - | - | |
| NZDUSD | - | - | - | - | - | - | - | ||
| SEKJPY | - | - | - | - | - | - | |||
| SGDJPY | - | - | - | - | - | - | - | ||
| USDCAD | - | - | - | - | - | - | - | - | - |
| USDCHF | - | - | - | - | - | - | |||
| USDCNH | - | - | - | - | - | - | - | ||
| USDCZK | - | - | - | - | - | - | - | - | |
| USDHUF | - | - | - | - | - | - | - | - | |
| USDJPY | - | - | - | - | - | - | - | ||
| USDMXN | - | - | - | - | - | ||||
| USDNOK | - | - | - | - | - | - | - | - | |
| USDPLN | - | - | - | - | - | - | - | - | |
| USDRUB | - | - | - | - | - | - | - | - | |
| USDSEK | - | - | - | - | - | - | - | - | |
| USDSGD | - | - | - | - | - | - | - | ||
| USDTHB | - | - | - | - | - | - | |||
| USDTRY | - | - | - | - | - | - | - | - | - |
| USDZAR | - | - | - | - | - | - | - | ||
| XAGAUD | - | - | - | - | - | - | - | - | |
| XAGEUR | - | - | - | - | - | - | - | - | |
| XAGUSD | - | - | - | - | - | - | - | - | - |
| XAUAUD | - | - | - | - | - | - | - | - | - |
| XAUEUR | - | - | - | - | - | - | - | - | - |
| XAUGBP | - | - | - | - | - | - | - | - | - |
| XAUJPY | - | - | - | - | - | - | - | - | |
| XAUUSD | - | - | - | - | - | - | - | - | - |
| XPDUSD | - | - | - | - | - | - | - | - | - |
| XPTUSD | - | - | - | - | - | - | - | ||
| ZARJPY | - | - | - | - | - | - | - | - | - |